All WordPress Elementor Themes Documentation
Thank you for choosing our free WordPress theme. If you have any questions that are beyond the scope of this help file, feel free to contact us via our Support ticket system . We will do our best to answer you in shortest of time (24-48 hours usually).
If you are a total newbie in WordPress, please head up to Overview with WordPress section which contains basic steps of WordPress.
Theme Requirements
To use Themes, make sure your hosting provider is running the following software:
- Latest stable version of WordPress.
- PHP 7.4 or greater. WordPress officially suggests to use PHP 8.3 or greater.
- MySQL 8.0+ or greater OR MariaDB version 10.11+ or greater.
Attention Please make sure you have latest version of WordPress installed. Also please see WordPress offical page for minimum requirements .
Javascript must be enabled on browsers viewing this theme. Though non-javascript browsers are supported, this is necessary for full-feature experience.
Recommended PHP Limits
Many issues that you may run into such as: white screen, demo content fails when importing, empty page content and other similar issues are all related to low PHP configuration limits. The solution is to increase the PHP limits. You can do this on your own, or contact your web host and ask them to increase those limits to a minimum as follows:
-
max_execution_time 300 -
memory_limit 256M -
post_max_size 64M -
upload_max_filesize 32M -
max_input_time 300 -
max_input_vars 3000
Also consider upgrading your PHP version to the latest version , the newer the better.
Theme Installation
Assuming that WordPress website is already set (for setting up WordPress blog refer to WordPress set up documentation at http://codex.wordpress.org/Getting_Started_with_WordPress#Installation , the next step is to install the theme.
Installing a free WordPress theme from WordPress.org is quick and easy. Follow the steps below to install and activate your theme directly from your WordPress dashboard.
-
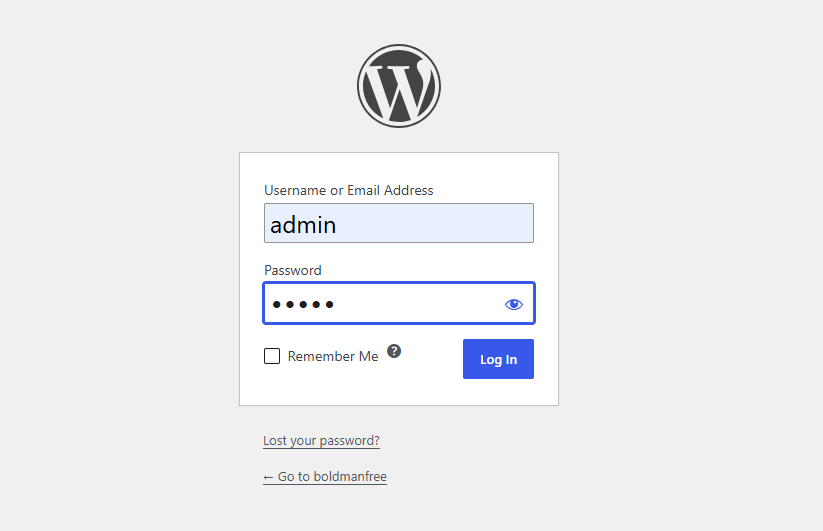
Login to Your WordPress Dashboard
First, log in to your WordPress admin dashboard using your WordPress administrator credentials.
You can access your dashboard by visiting: yourwebsite.com/wp-admin
-
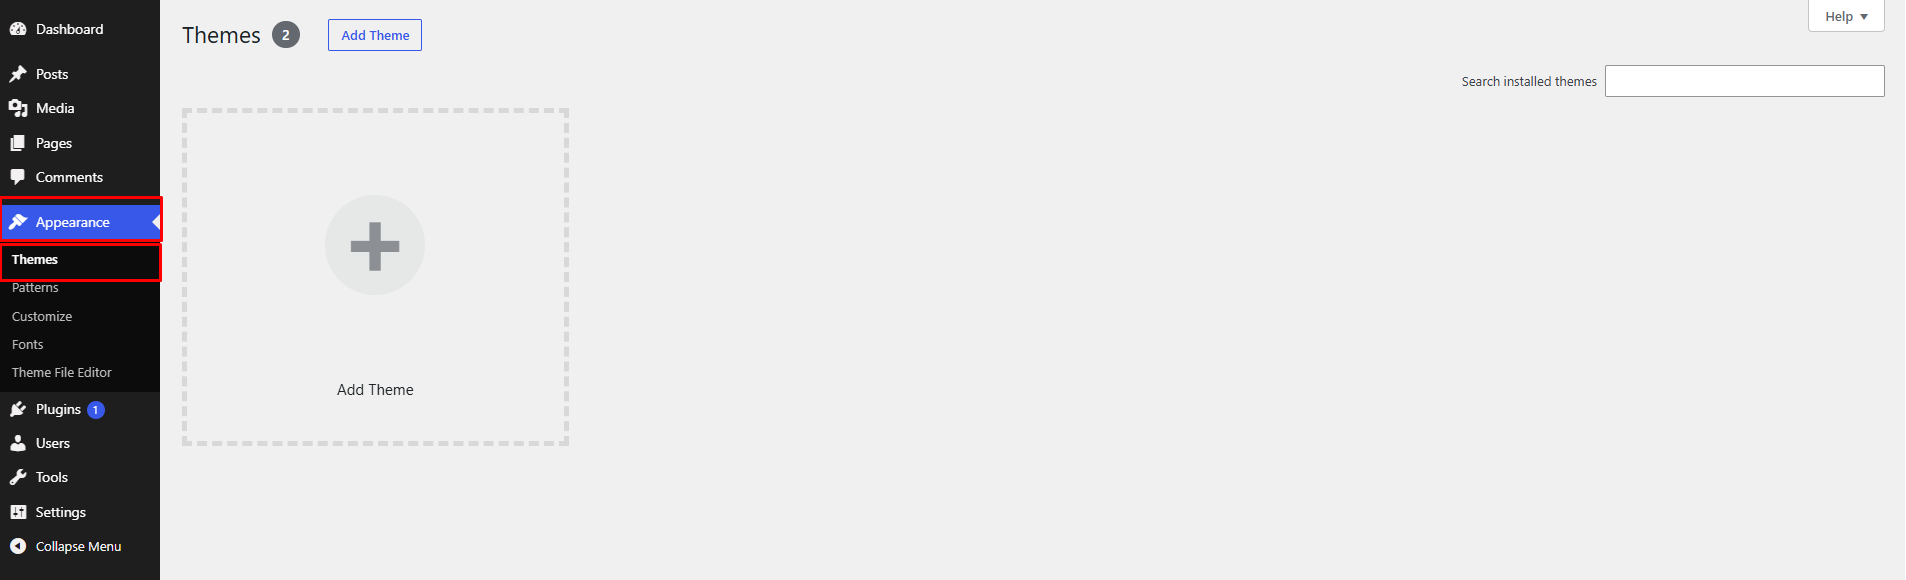
Go to Themes
From the WordPress dashboard, navigate to:
Admin Dashboard > Appearance > Themes
-
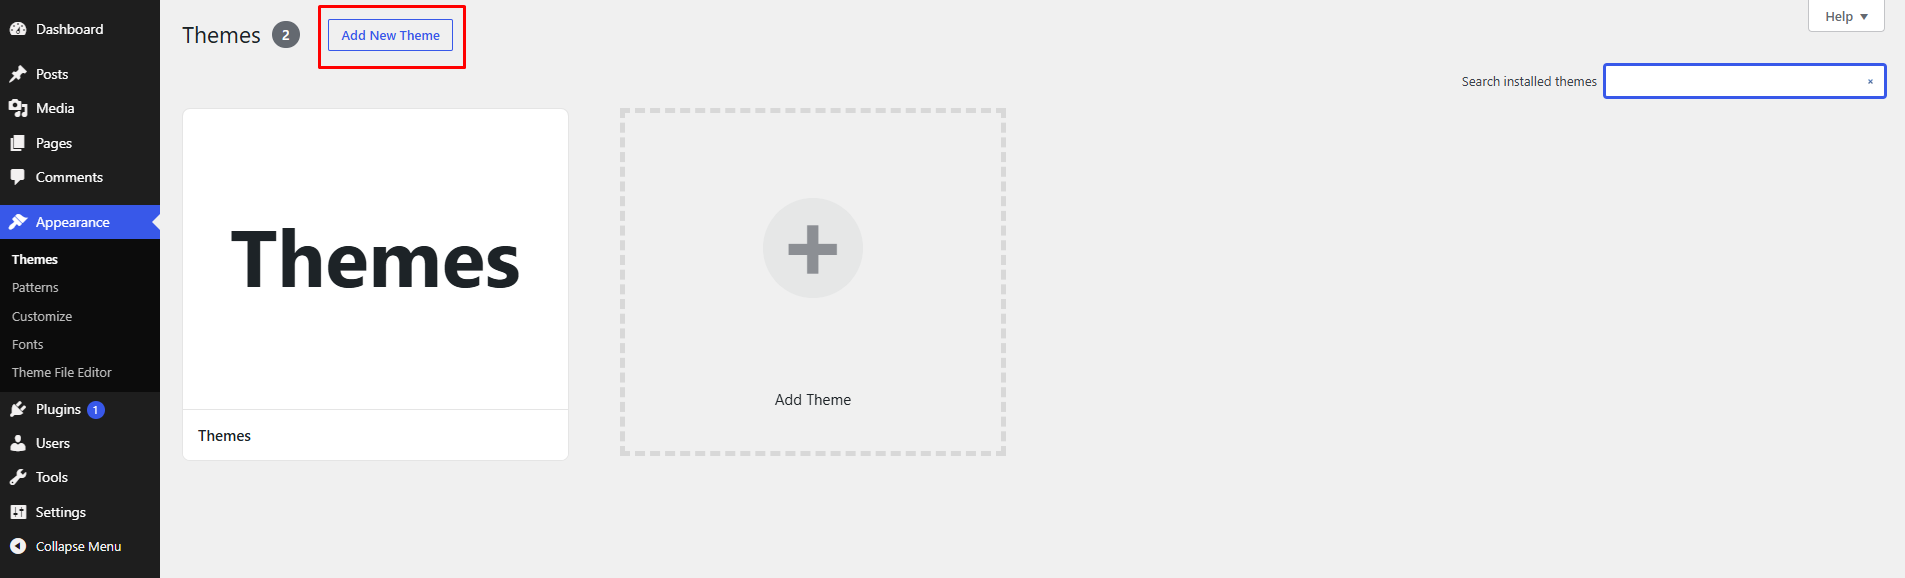
Click Add New Theme
On the Themes page, click the Add New Theme button to browse the available free themes from the WordPress.org Theme Directory.
-
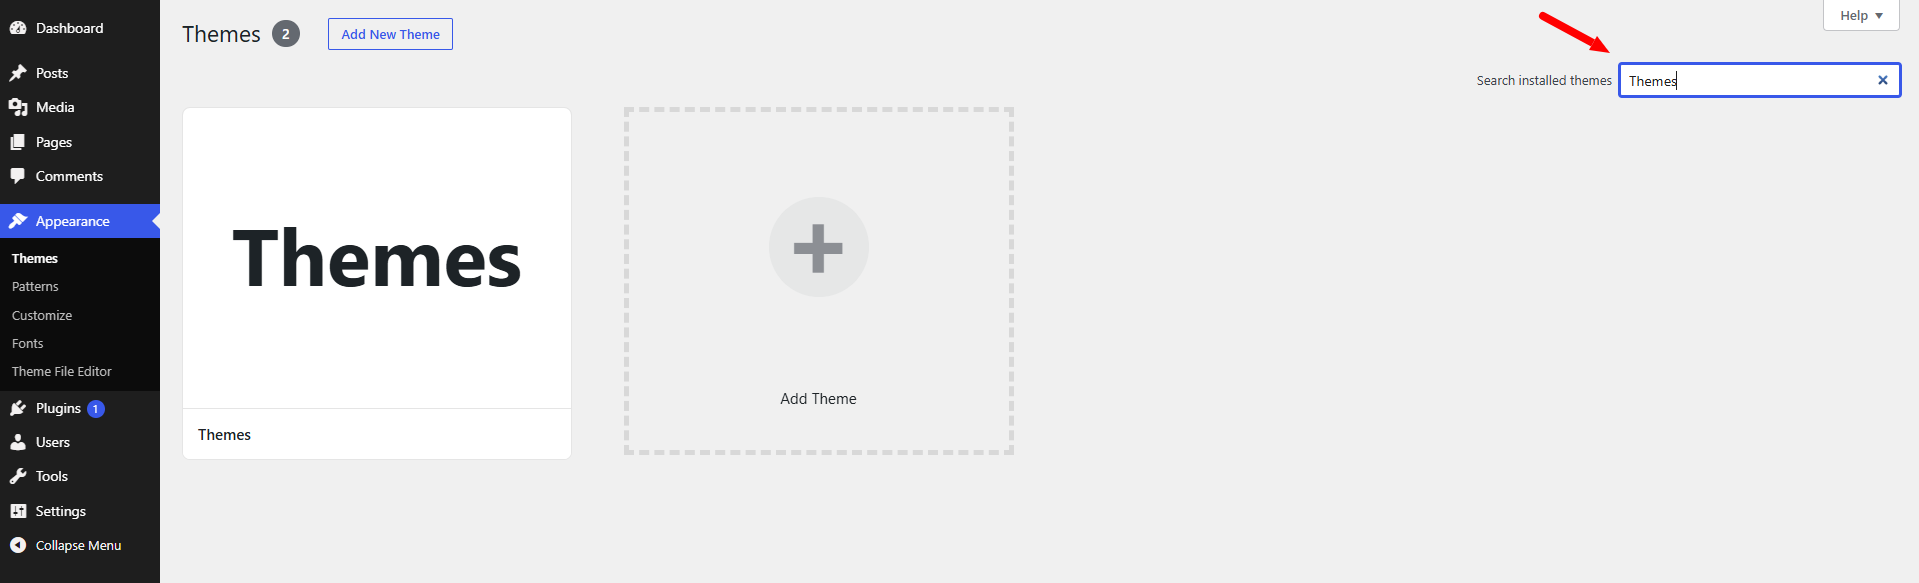
Search for Your Theme
Use the search box to search for your theme by name. For example, you can search for Themes.
-
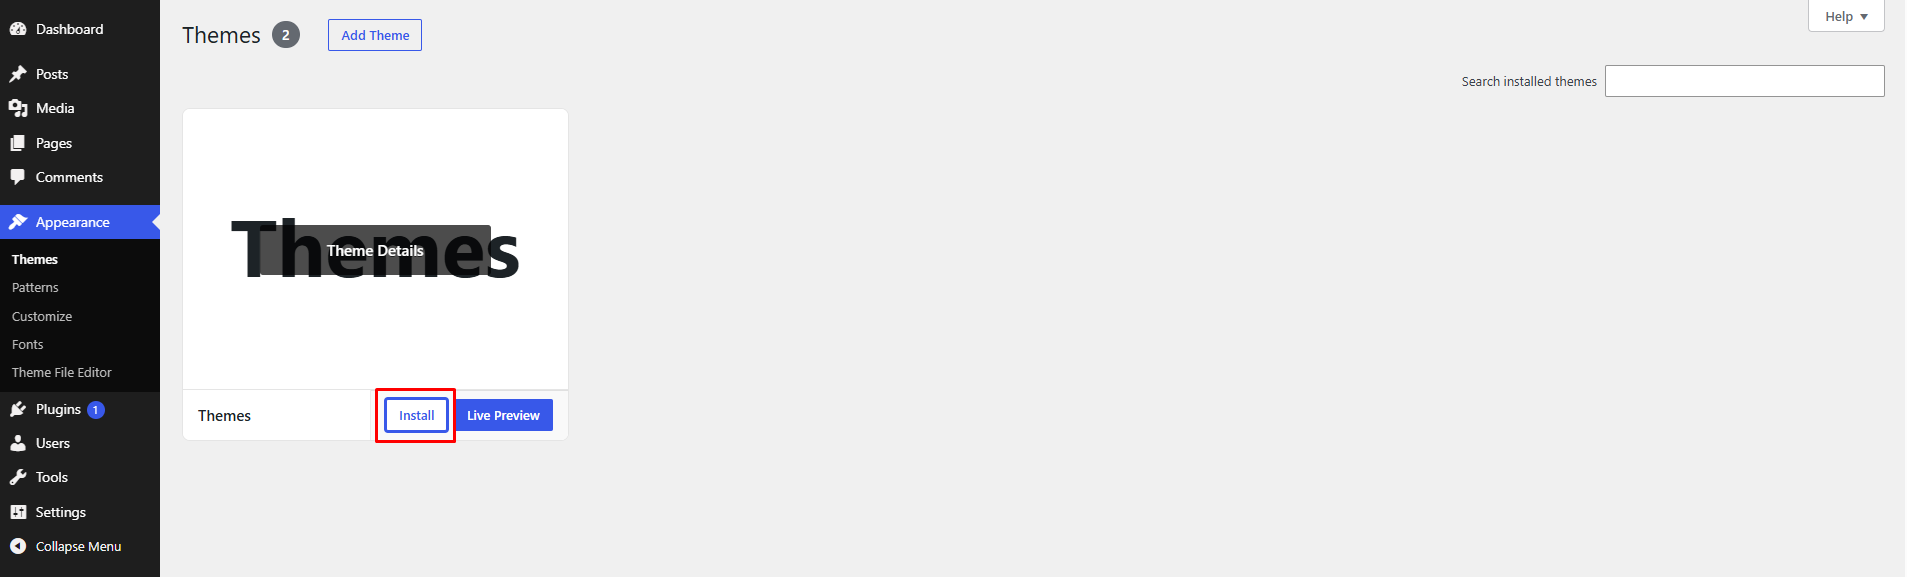
Install the Theme
Once you find your theme, hover over the theme and click Install.
WordPress will automatically download and install the theme from WordPress.org.
-
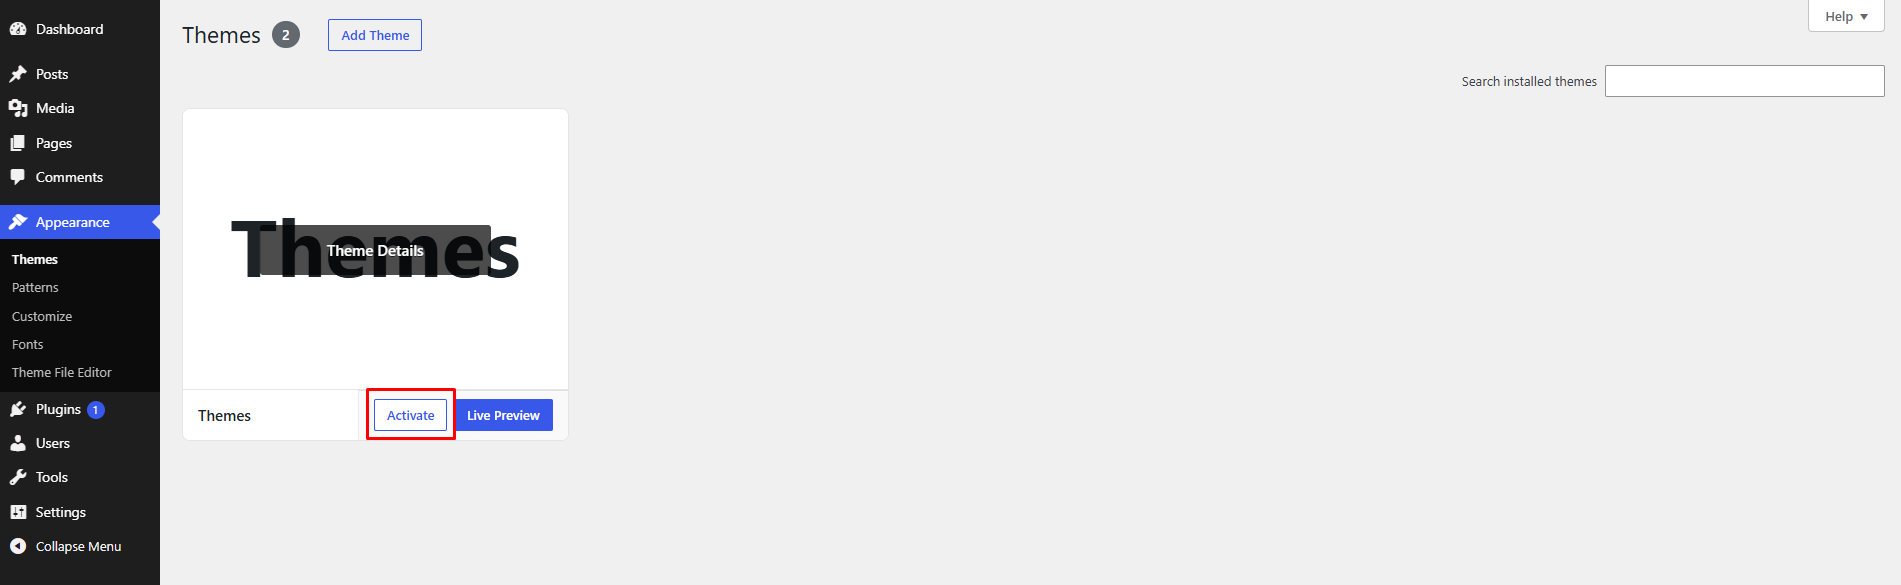
Activate the Theme
After the installation is complete, click the Activate button to make the theme active on your website.
-
Visit Your Website
After activating the theme, click Visit Site or open your website in a new browser tab to check the newly installed theme.
Install theme via FTP
Use an FTP client such as FileZilla , FireFTP or Cyberduck (if you are a Mac user) to connect to your hosting account. To manually upload your new WordPress theme, login with your credentials to your website and locate the wp-content folder in your WordPress install files. Upload the un-zipped 'Theme' folder into the: wp-content/themes folder.
Once uploaded, activate the theme by heading to the “Themes” menu in the WordPress Dashboard. Locate the Theme Theme and hit “Activate”.
The theme files will be stored on your server in the
wp-content/themes/
location.
- Download the theme zip file from your Themetechmount account from Themetechmount.
- **All files & documentation **(full zip folder) . You will need to extract and locate the installable WordPress file to upload when installing theme
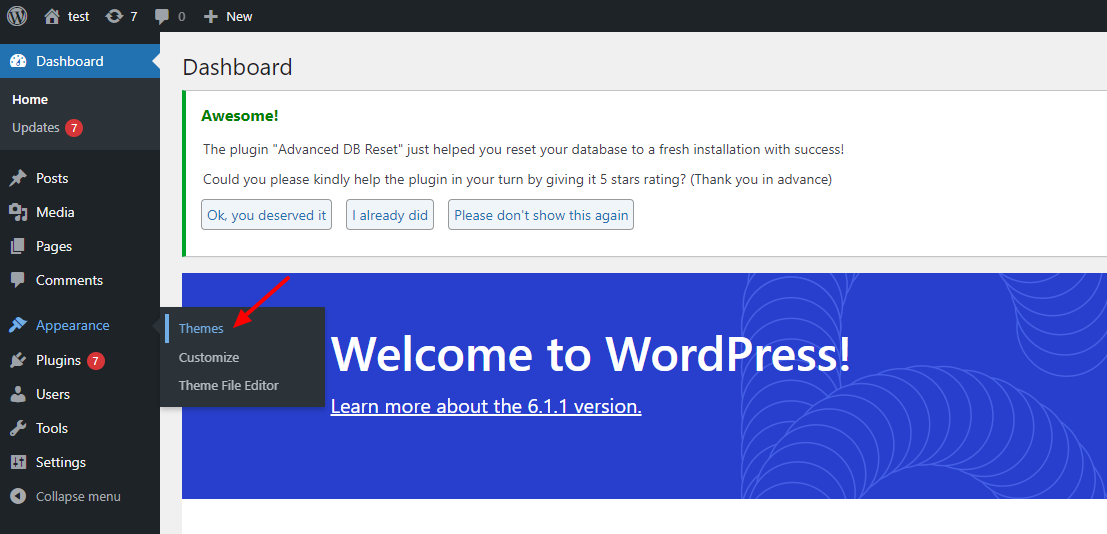
- Log in to your WordPress Dashboard (Ex: http://yourwebsite.com/wp-admin).
- Navigate to
Appearance > Themes.
- Click on
Add New
and then Click on
Upload Theme
.
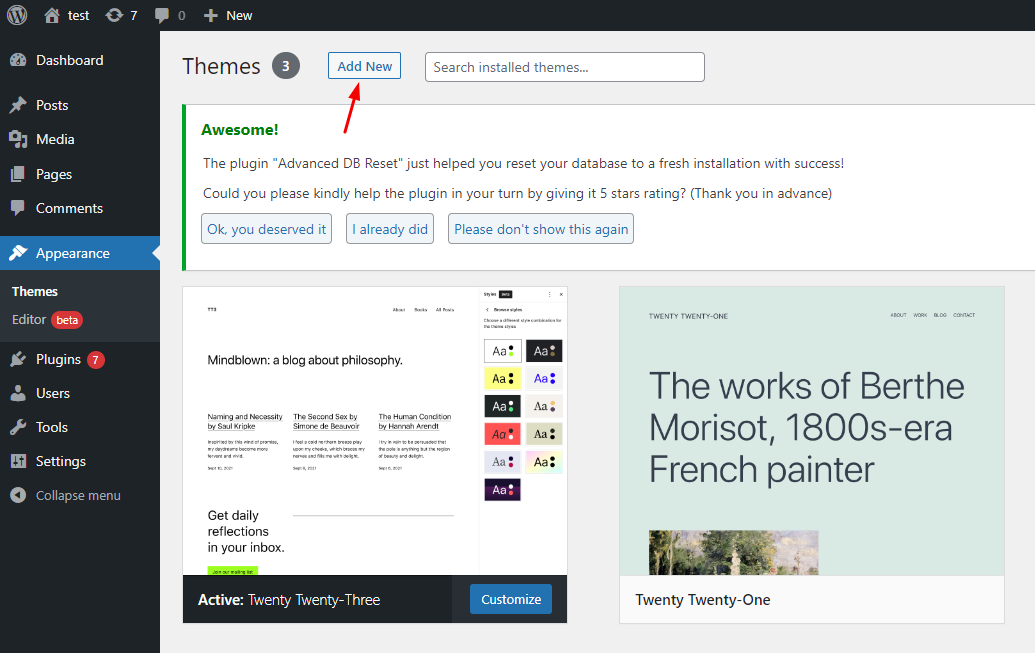
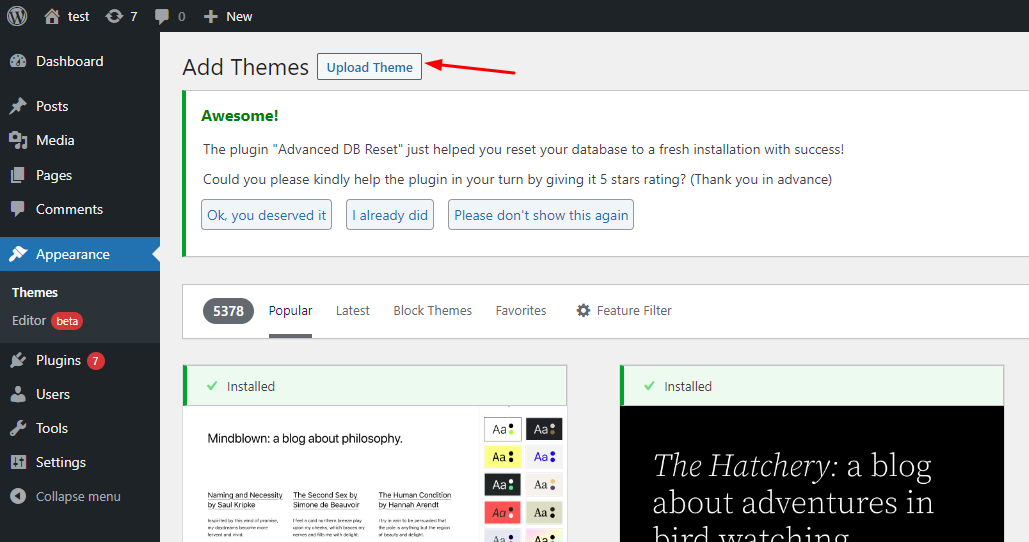
- Click
Add New
, then click
Upload Theme
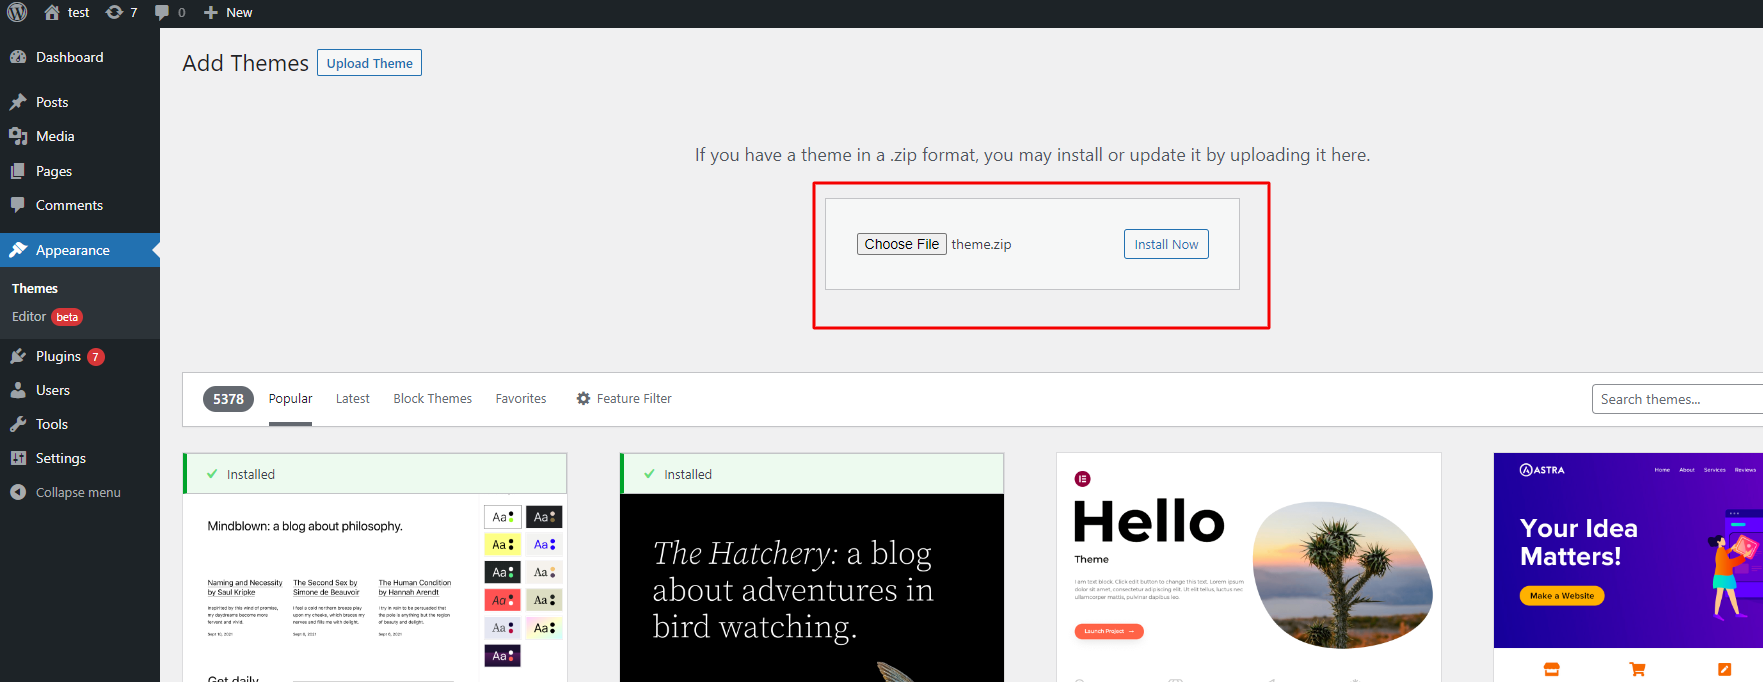
>
Choose File
- Navigate to the
.zip
file on your computer, then click
Install
Now
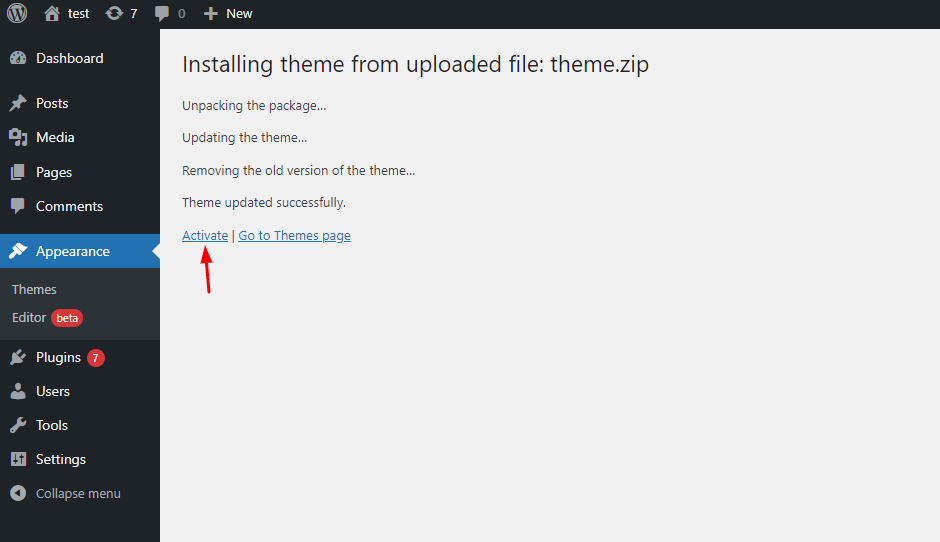
- When the installation complete, click
Activate
. You will be redirected to Themes page with Theme activated.
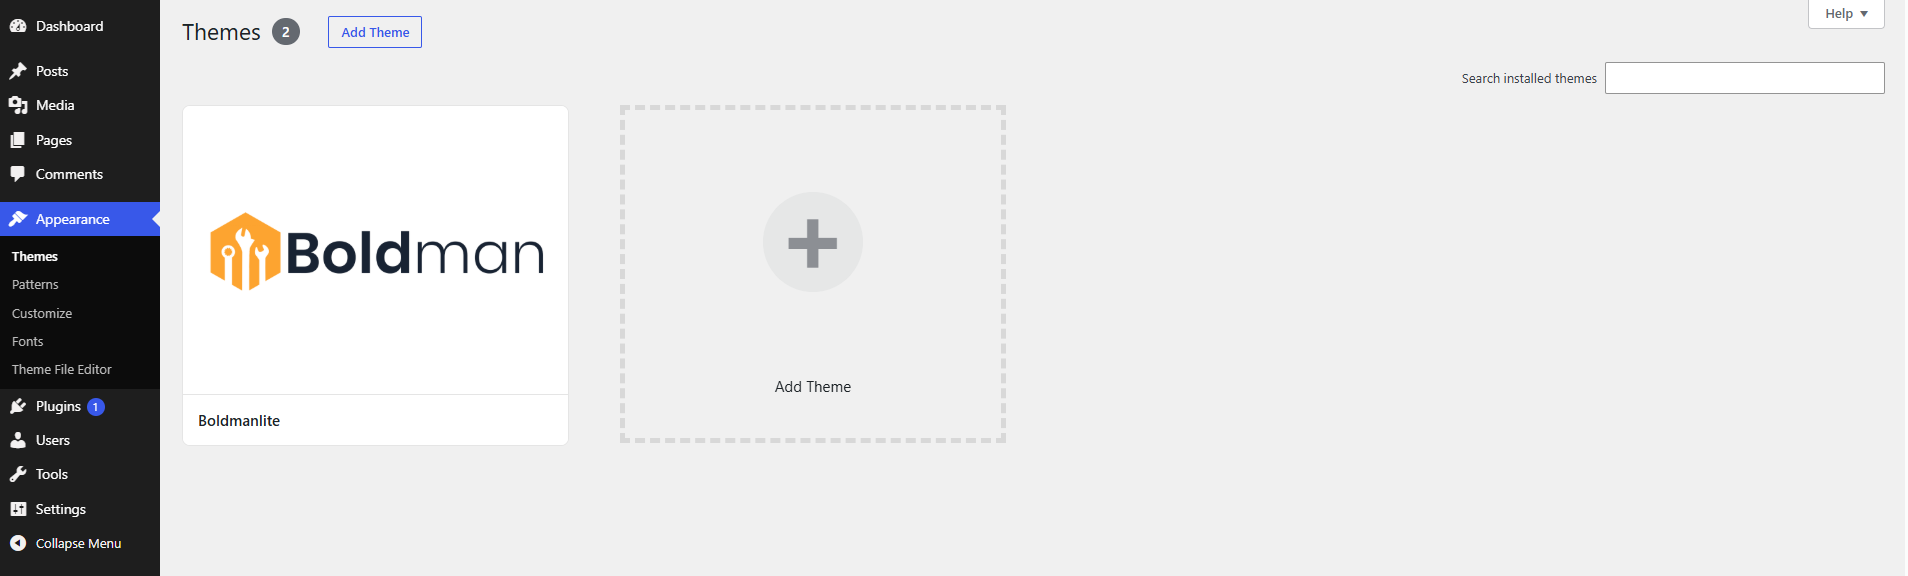
- Done.
Plugin Installation
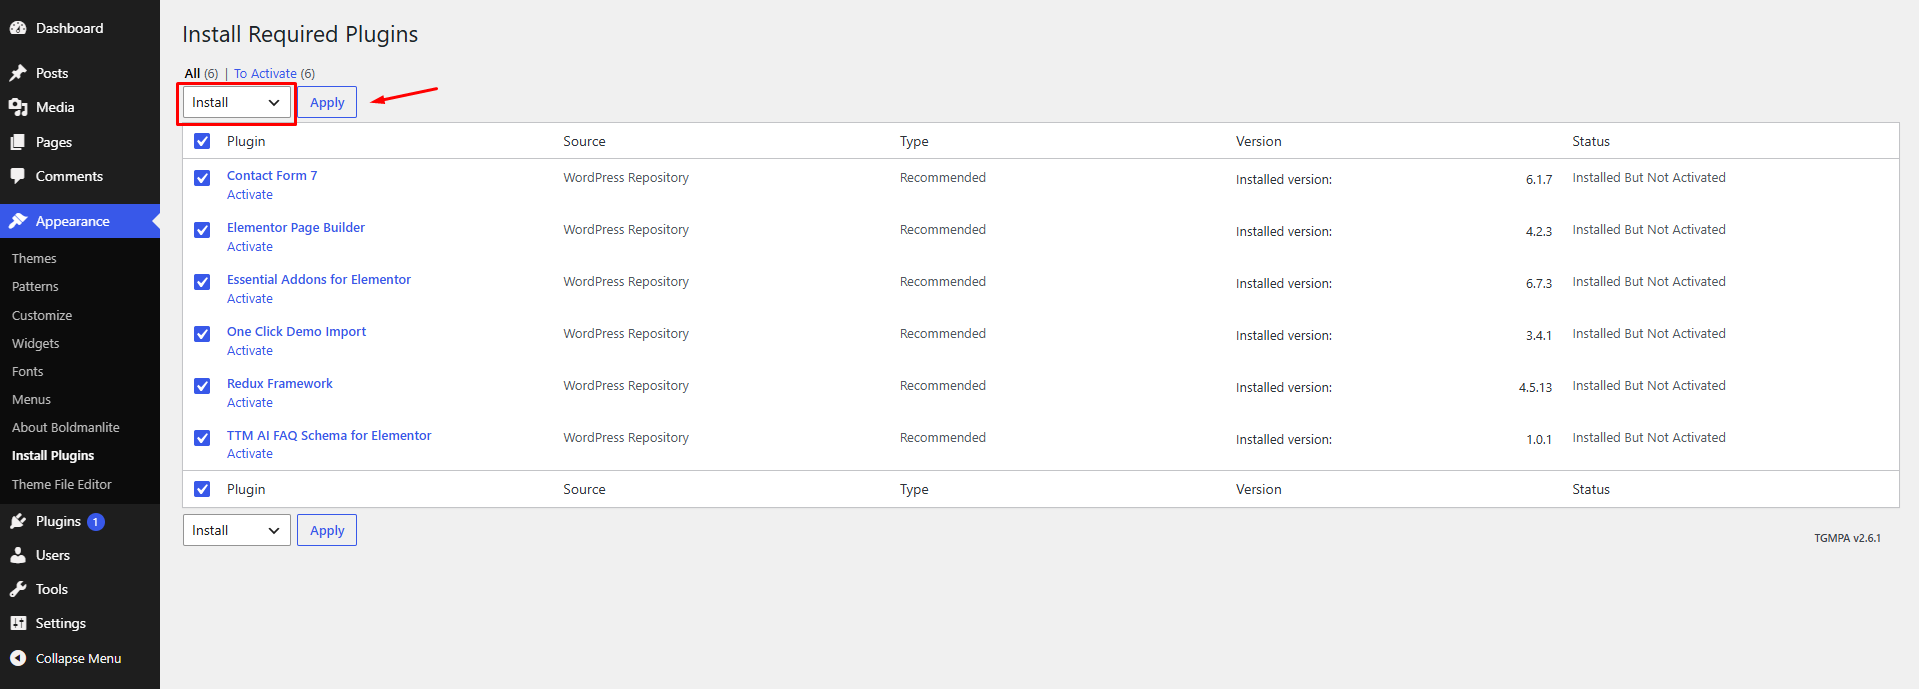
After theme activation, you will get message to install some required plugin:

Click Begin installing plugins . You will be navigated to Install Required Plugins page.
Simply check all of them (or all of required plugins and some recommended plugins you like) and from the drop down select Install , then hit Apply .
Demo Installation
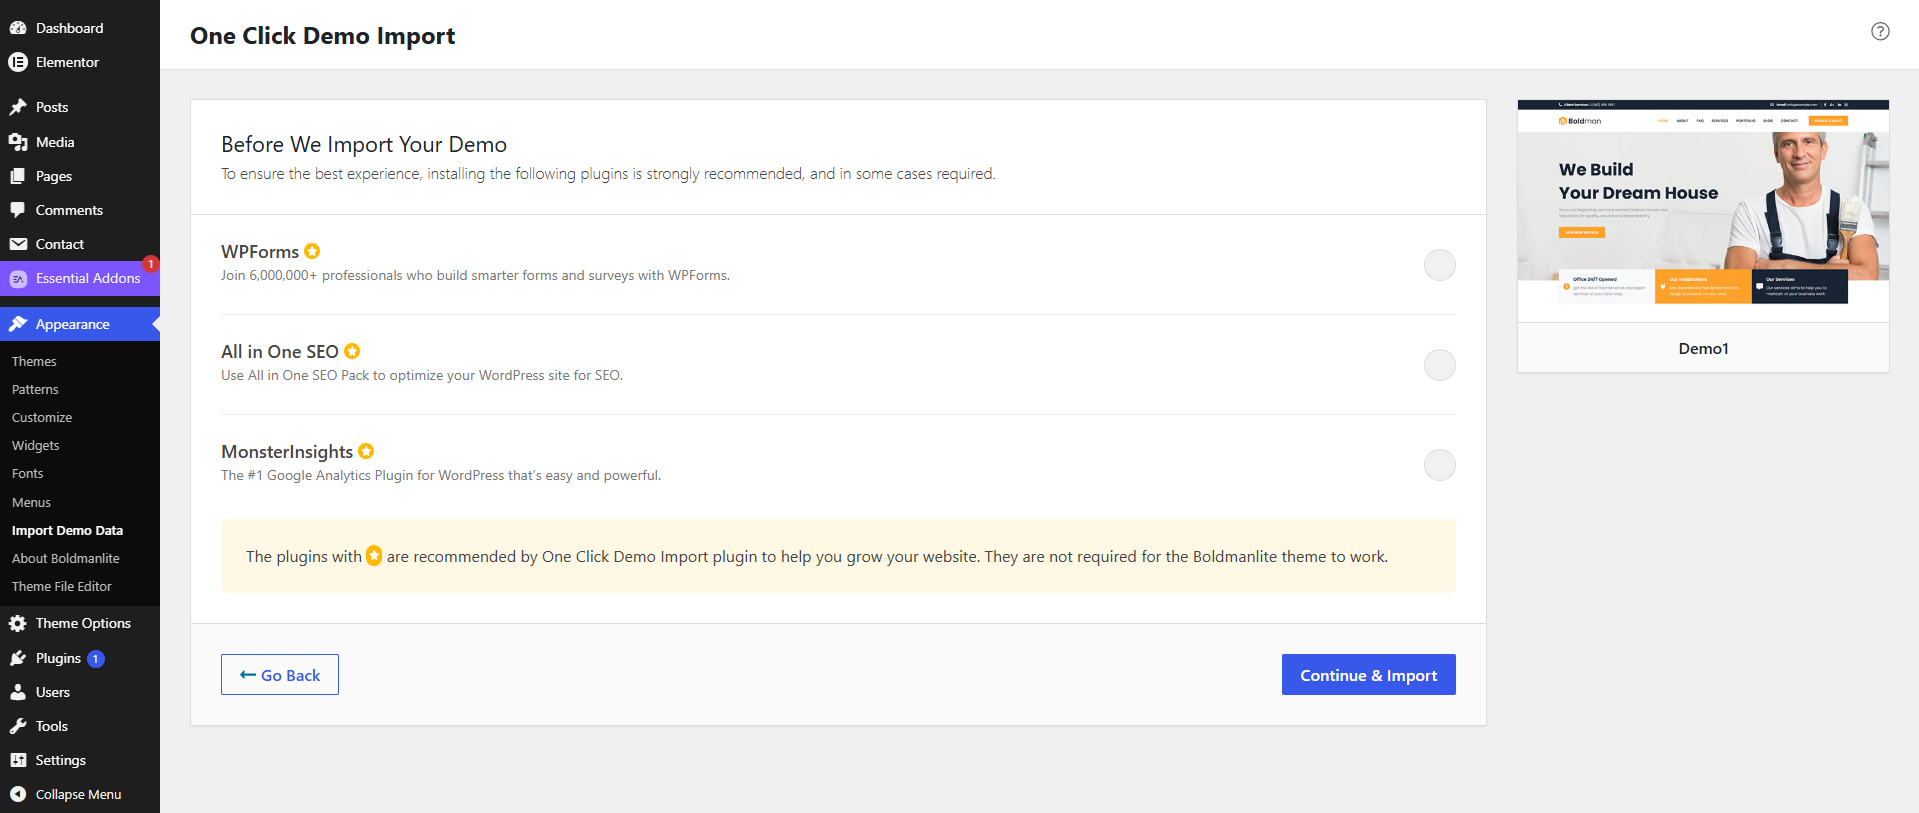
We set easy one-click process for full demo content setup. Please follow steps given below. All you need to do is to navigate to Admin > Appearance > Import Demo Data Page . Hit Import this demo .Click Continue & Import.
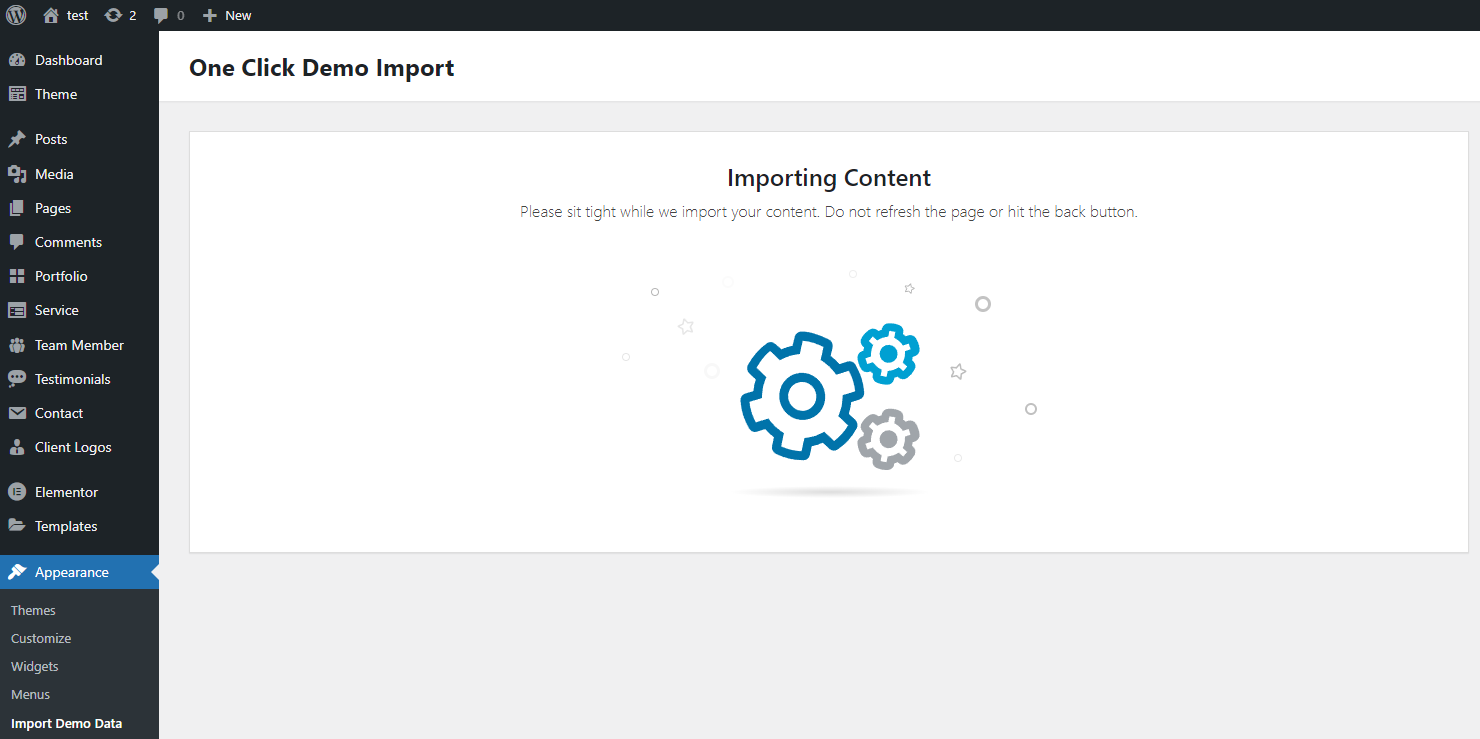
Wait until the import routine is done. Please be patient and don’t navigate away, as this can take few minutes depending on your host’s performance.
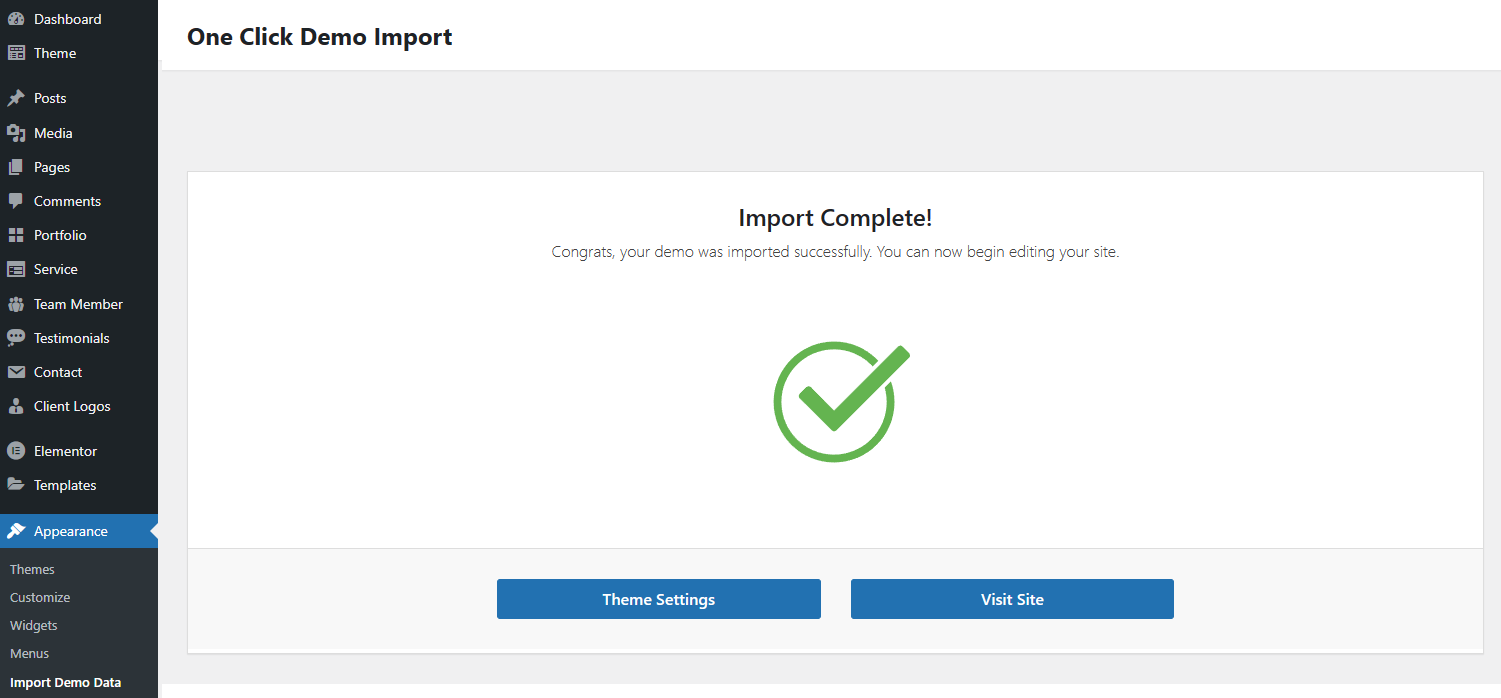
When finishing, You will be notified once the process is completed it should look like this:
Theme Options
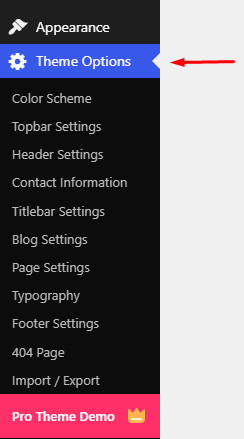 You can customize Theme settings via "Theme Options". You can upload logo or change skin color etc. Here are details of each section that you can customize.
Color Scheme Settings
You can change Layout color related changes here. Like you can select Skin color from here or etc.
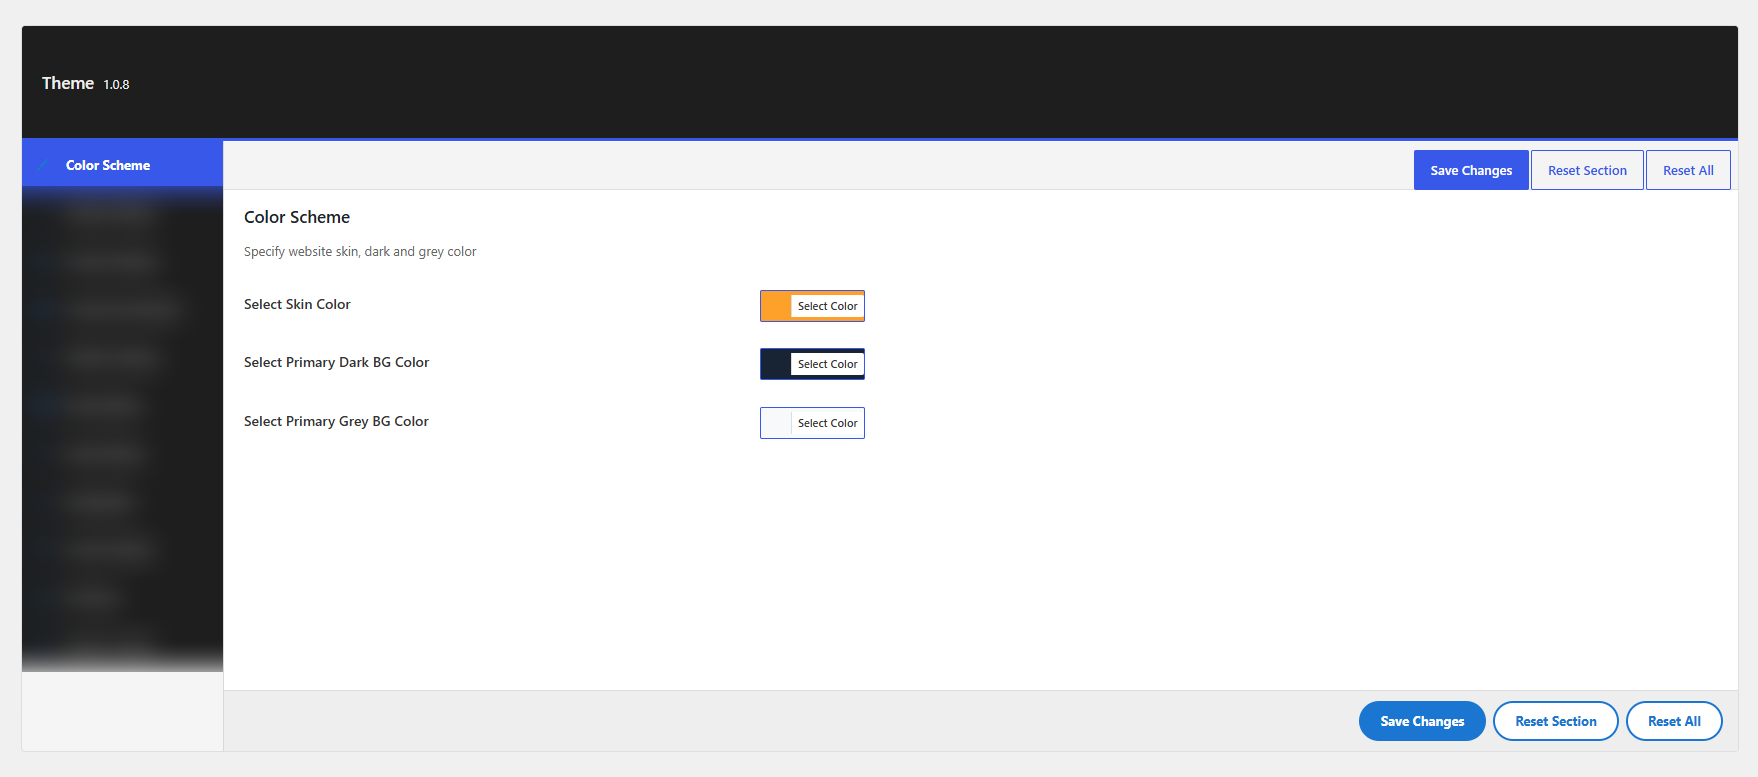
This is the global color for all hightlighted things. This color will be used in Tabs, Accordion, Progress bar, text link and other areas. We have provided some pre-defined colors for you which you will also find on our demo site.
Site Layout Settings
You can change Layout related changes here. Like you can switch to Boxed or Wide layout etc.
Font Settings
In this section you can customize the font properties for use across your website. You can choose from over 800 Google fonts and they are all open-source and 100% free for commercial use.
- Body Typography – configure the global body font typography.
- H1, H2, H3, H4, H5, H6 Headings – configure the global heading font typography.
- Heading and Subheading Font Settings – configure the global Heading and Subheading font typography.
- Specific Element Fonts – configure the global Specific Element font typography.
Topbar Settings
You can change topbar settings from here.
- Show Topbar Bar – option to enable/disable showing the topbar.
- Topbar Background Color – select the topbar background color.
- Topbar Text Color – select the topbar text color.
- Topbar Text Size – select the topbar text size.
- Topbar Content Options – Using the Topbar Left Content and Topbar Right Content you have the option to display Contact Info, Social Links and Navigation etc.

Titlebar Settings
You can change titlebar settings from here.
- Show Titlebar Bar – option to enable/disable showing the titlebar.
- Titlebar Background Options – select the titlebar background color and image.
- Titlebar Content Options – select the Titlebar Height.
Header Settings
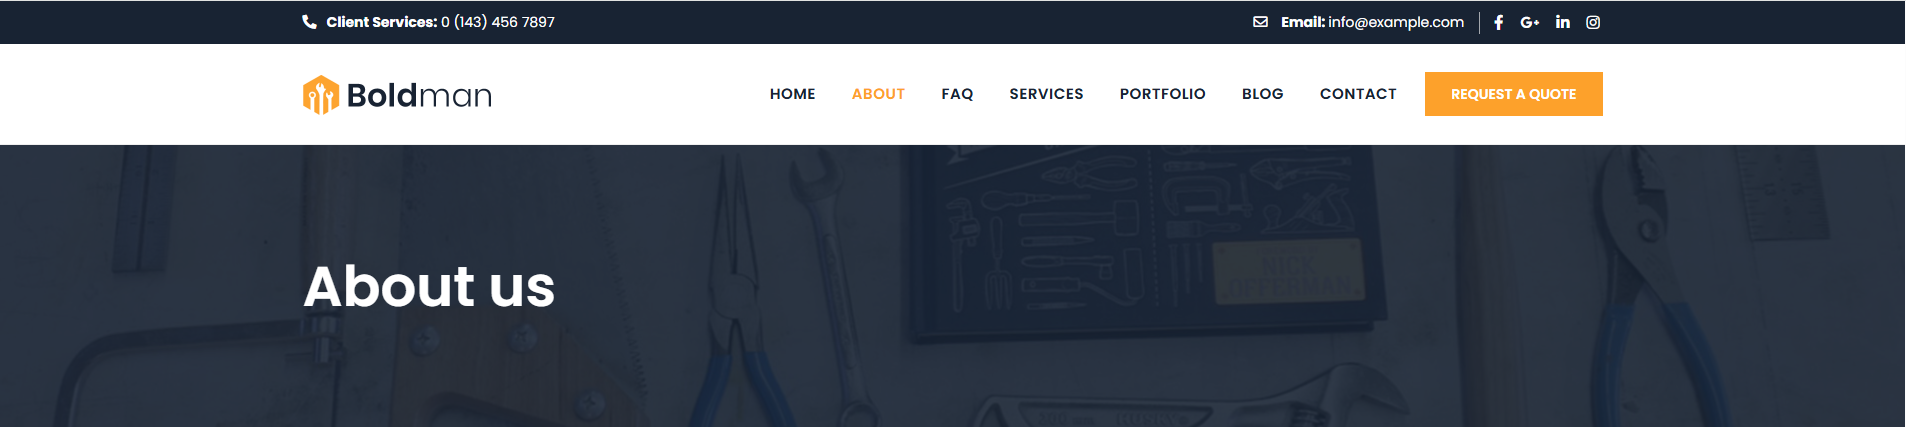
You can change header settings from here. You can upload logo, header height etc.
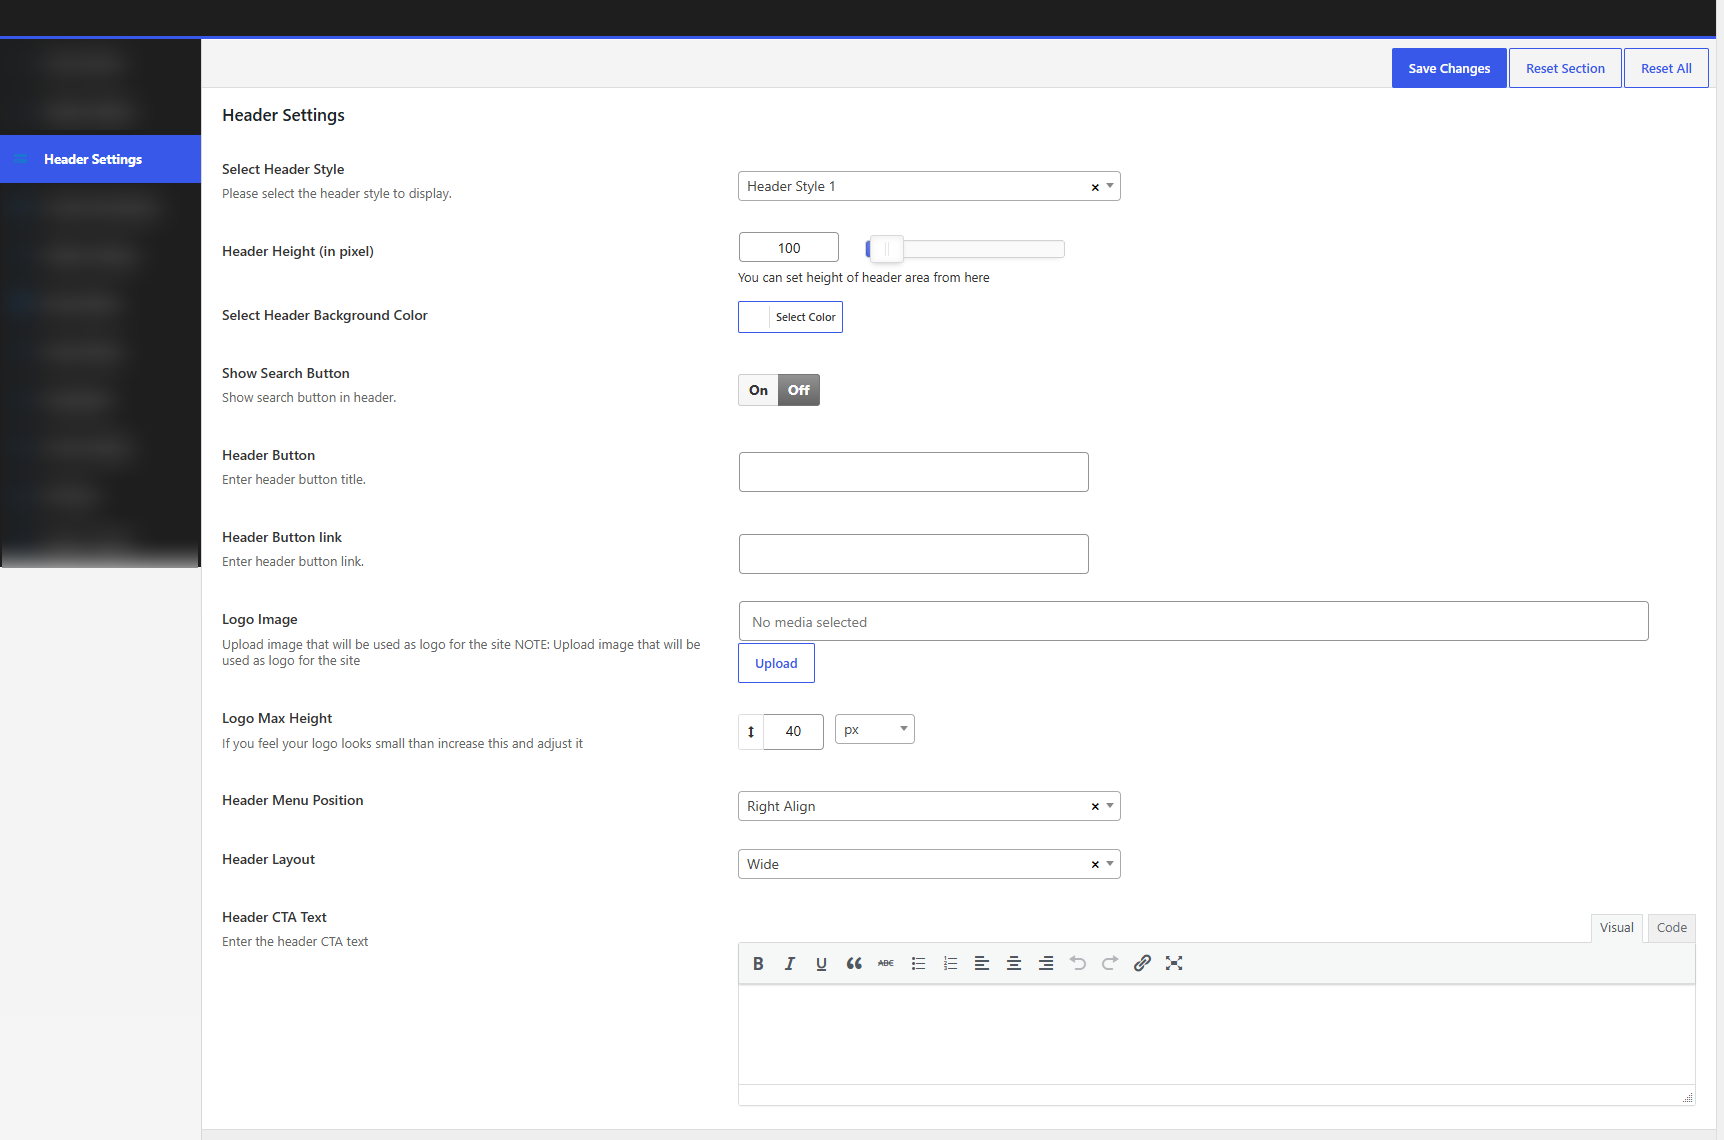
- Header Style – Options to change header style.
- Header Height (in pixel) – You can set height of header area from here.
- Header Background Color – select the header background color.
- Logo Image – option to upload image that will be used as logo for the site.
- Logo Max Height – option to your logo looks small then increase this and adjust it.
- Search Button in Header – Option to show or hide search button in header area and set Search Form Input Word, Search Form Title, Search Form Background.
- options for selected header – Options to set header button, Header Text Area, Header Menu Position.
Footer Settings
You can change footer text from here. To be able to make changes to the footer, you should first locate the exact theme areas and adjust the right elements.
- Footer Column layout change the Select Footer Column layout View option
- Footer Background (full footer elements) – option to set background properties like color, image for all footer area.
- Widget Area – Options to change settings for footer widget area. to set Footer Widget Columns, Footer Background Color, Footer Background image, Footer Text Color, Border Separator Between Widget, Border Above First Footer.
- Border Between Footer First And Second Footer Widget Area – option to set Horizontal border between First and Second Footer Widget Area.
- Footer Copyright Text Area – Options to change settings for footer text area. This contains copyright information like Copyright Area Text Left, Copyright Area Text Right, Copyright Area Background Color, Copyright Area Background, Copyright Area Text Color, Border Above Copyright Text.
Button Settings
You can change setting for global button from here.
- Button Font – option to configure the global button font typography.
- Button Top Bottom Padding – option to set button top and bottom of space of medium button.
- Button Font Size – option to set font size of medium button.
- Global Buttons Shape – Options to set button shape like square, round, rounded.
Blog Settings
You can change settings for Blog section from here.
Options to set Blog Excerpt Limit, "Read More" Link Text, Blog view, Details Page Style, Social Share, Settings for meta data for Blog classic view and Blogbox.
Error 404 Page Settings
One of the most common errors you can come across while browsing the Internet is a 404 or Page Not Found error. This error often occurs when you follow a broken link or if you type in a website address that doesn’t exist. A 404 page error appears when a website is active, but the specific page within it doesn’t exist. Here you can change the settings of the 404 Page.
- Pagetitle – set the page subtitle. The default value is: This page could not be found!
- Description text – set the page description text. The default value is: This page could not be found!
Import / Export
You can import or export theme settings from here. This will be usefull when you are developing your site on other server and want to move only theme settings. Just click "Download" button to export the settings and click "Import from file" button to import it.
Note: When you click on "Import from file" then it will open new textbox. Just open the downloaded file in any text editor and copy paste code here to import.
Widgets
Widgets Position
Theme has some built-in Widget Positions to use. Here are details of each position:
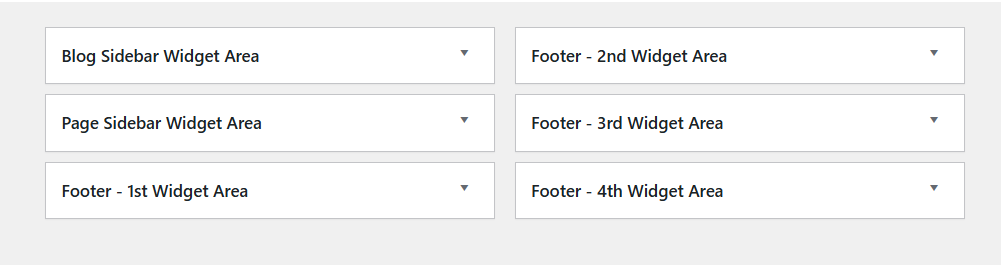
- Blog Sidebar Widget Area: You can add Widgets that you want to display as sidebar for Blog pages like Blogroll, Category, Tag, Archives etc pages.
- Pages Sidebar Widget Area : You can add Widgets that you want to display as sidebar for pages that you created using Pages section.
- Footer - 1st Widget Area: This will be shown as 1st column in 1st row of footer area. You can set how many columns you like to show from "Theme Options > Footer Settings" section.
- Footer - 2nd Widget Area: This will be shown as 2nd column in 1st row of footer area. You can set how many columns you like to show from "Theme Options > Footer Settings" section.
- Footer - 3rd Widget Area: This will be shown as 3rd column in 1st row of footer area. You can set how many columns you like to show from "Theme Options > Footer Settings" section.
- Footer - 4th Widget Area: This will be shown as 4th column in 1st row of footer area. You can set how many columns you like to show from "Theme Options > Footer Settings" section.
Footer Widgets
Theme comes with special widget positions for footer area:
Footer Widget Area:
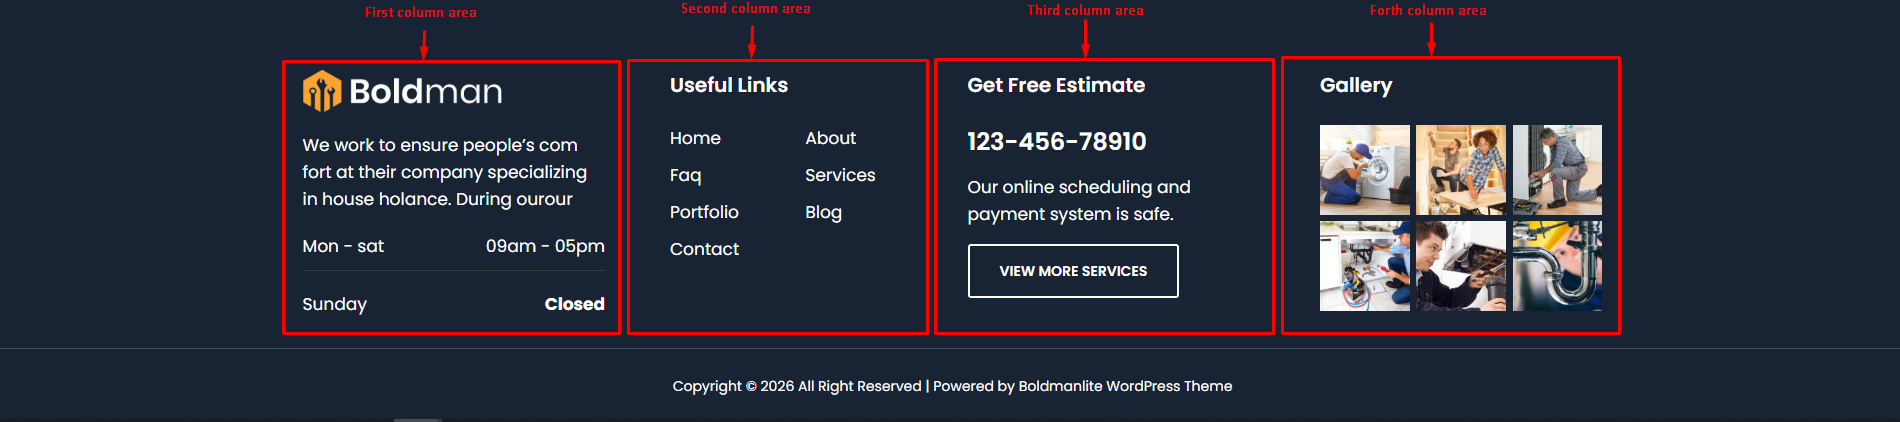
- Footer - 1st Widget Area: This will be shown as 1st column in 1st row of footer area. You can set how many columns you like to show from "Theme Options > Footer Settings" section.
- Footer - 2nd Widget Area: This will be shown as 2nd column in 1st row of footer area. You can set how many columns you like to show from "Theme Options > Footer Settings" section.
- Footer - 3rd Widget Area: This will be shown as 3rd column in 1st row of footer area. You can set how many columns you like to show from "Theme Options > Footer Settings" section.
- Footer - 4th Widget Area: This will be shown as 4th column in 1st row of footer area. You can set how many columns you like to show from "Theme Options > Footer Settings" section.
Create a New Page
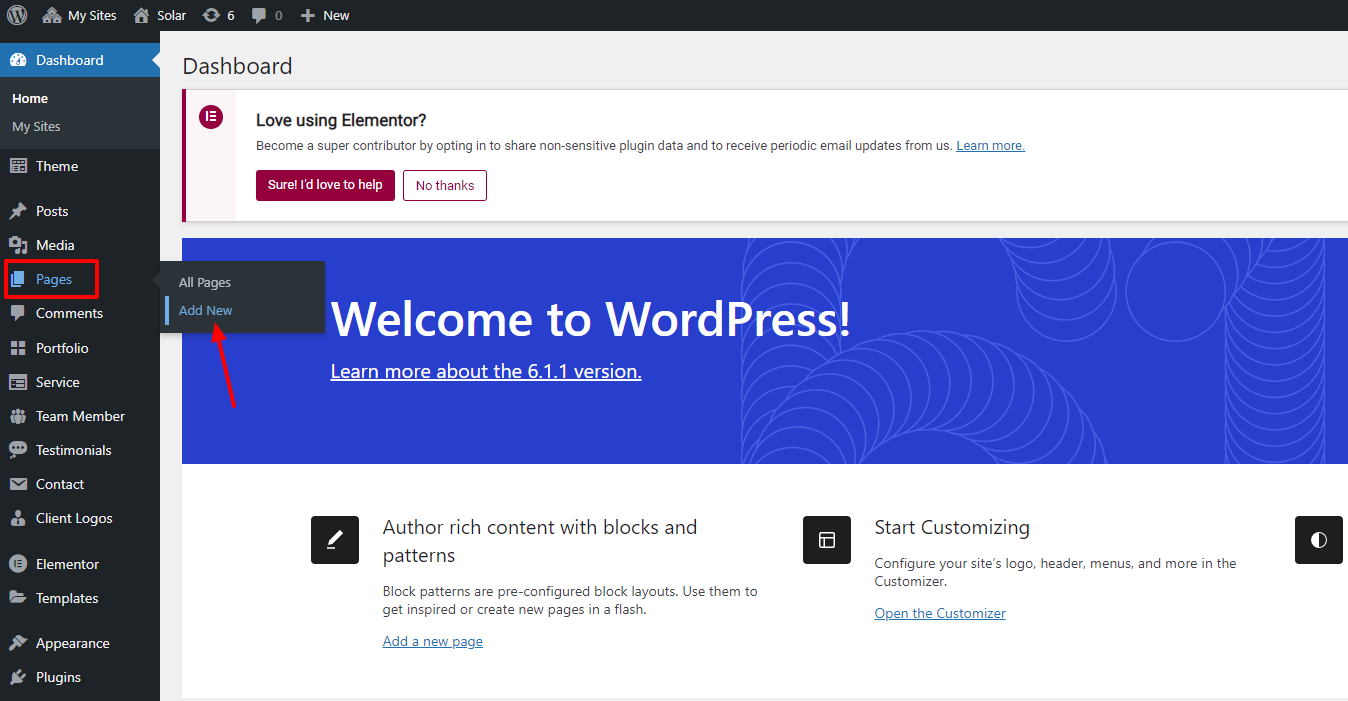
Step 1 : Navigate to Pages in your admin sidebar and click Add New option.
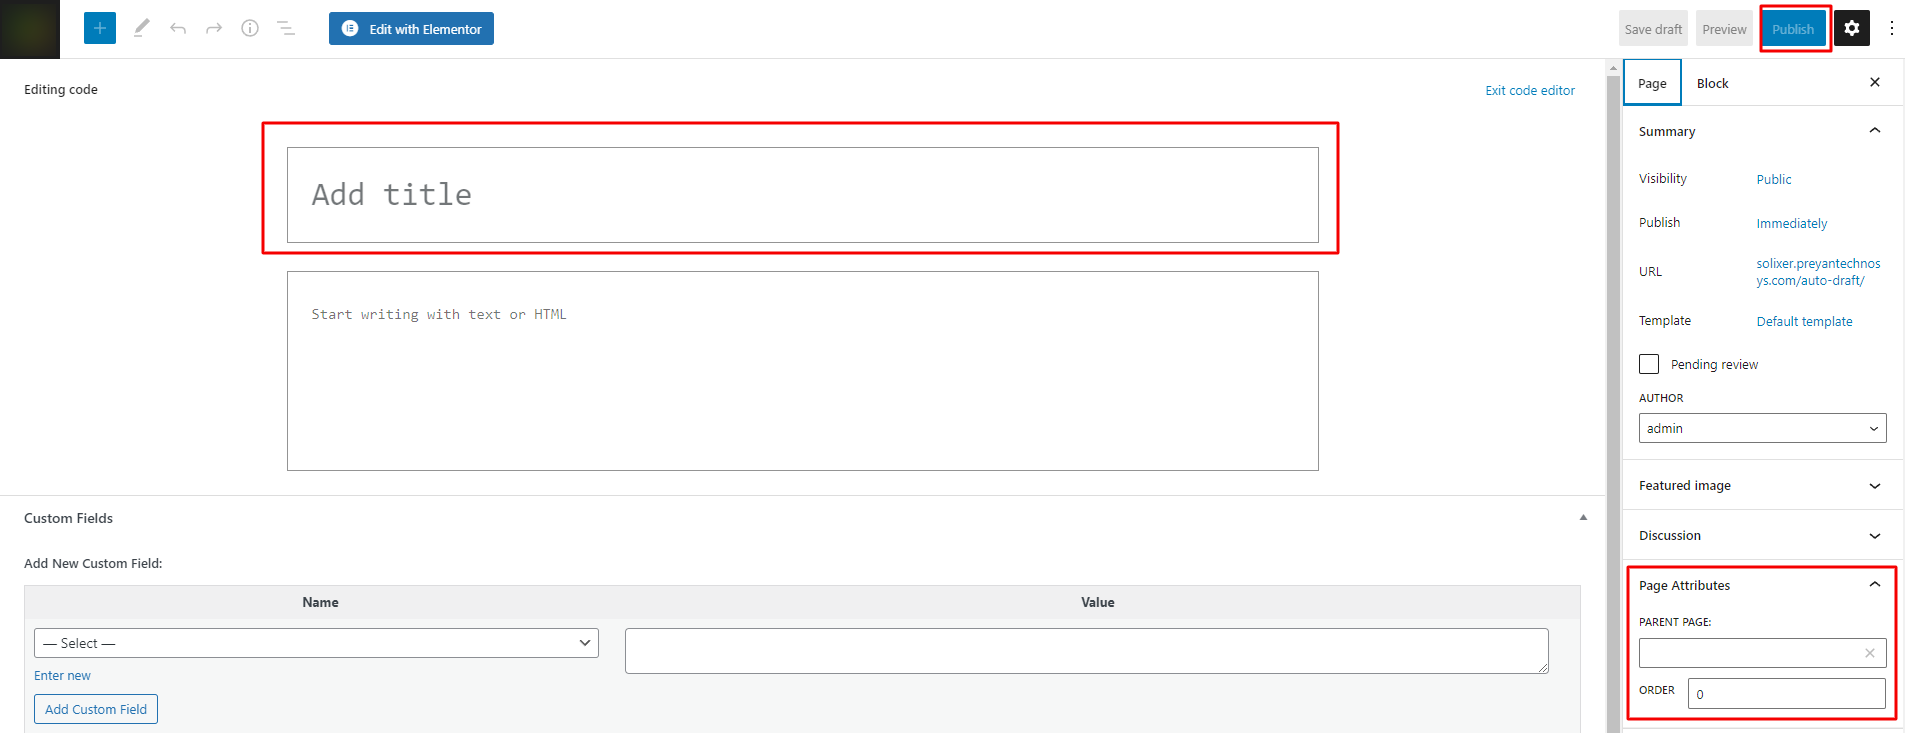
Step 2 : Enter a new name for your page, then find the Page Attributes box on right side to set your Parent or Template page.
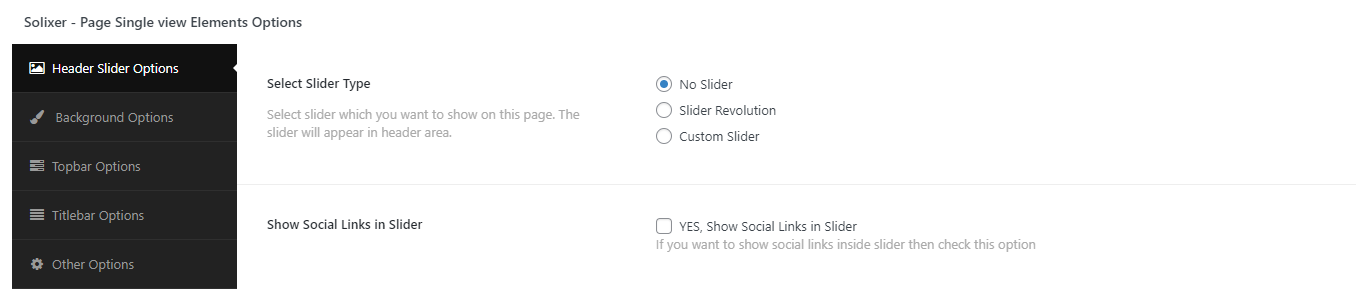
Page Options
Here includes various options to control Some Elements Options on each page.
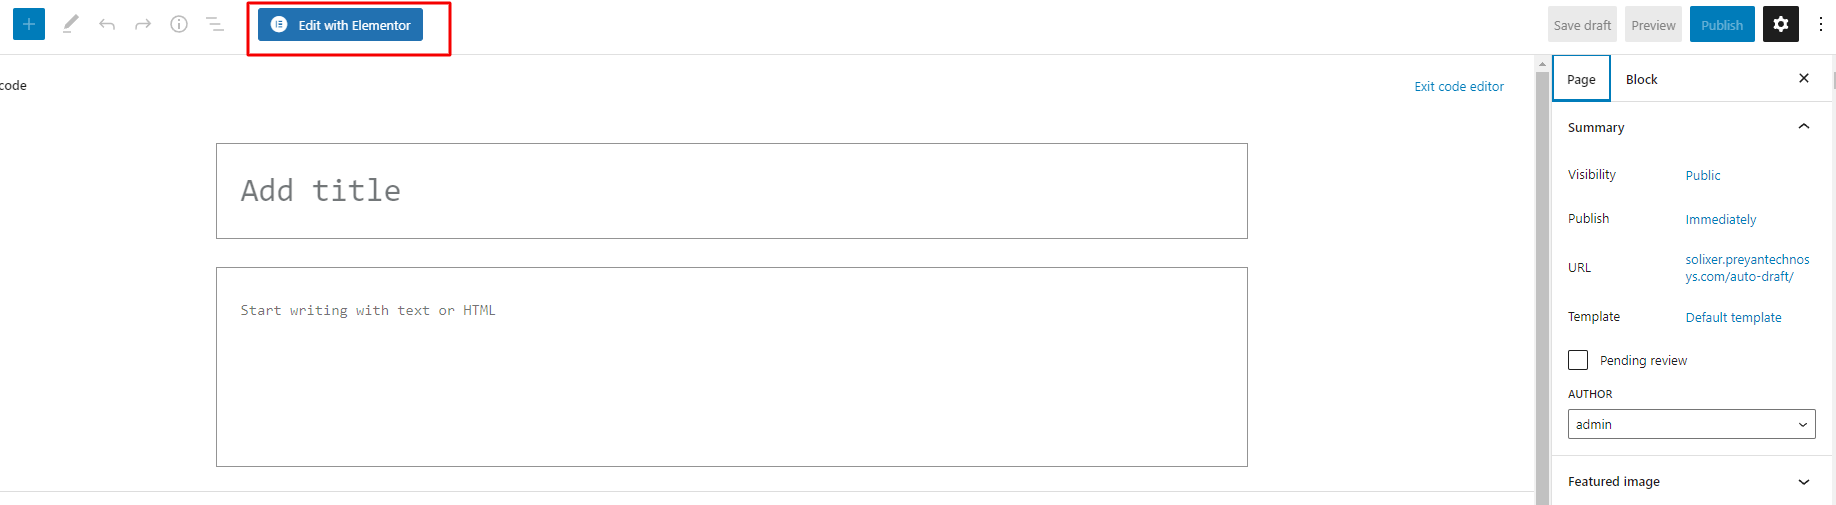
Use Elementor Page Builder to Build Page
Step 1 : Choose Edit With Elementor to edit your page.
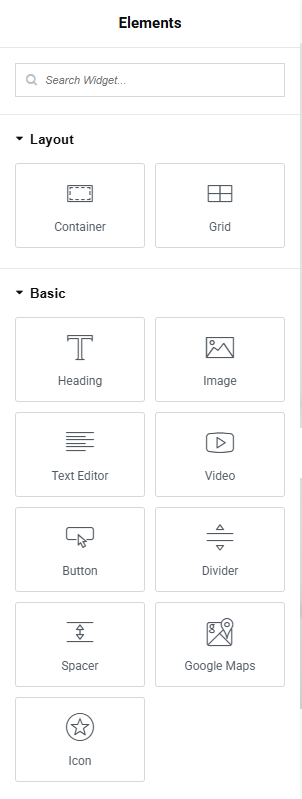
Step 2 : Choose Add Element to start adding our premade elements to your new page.
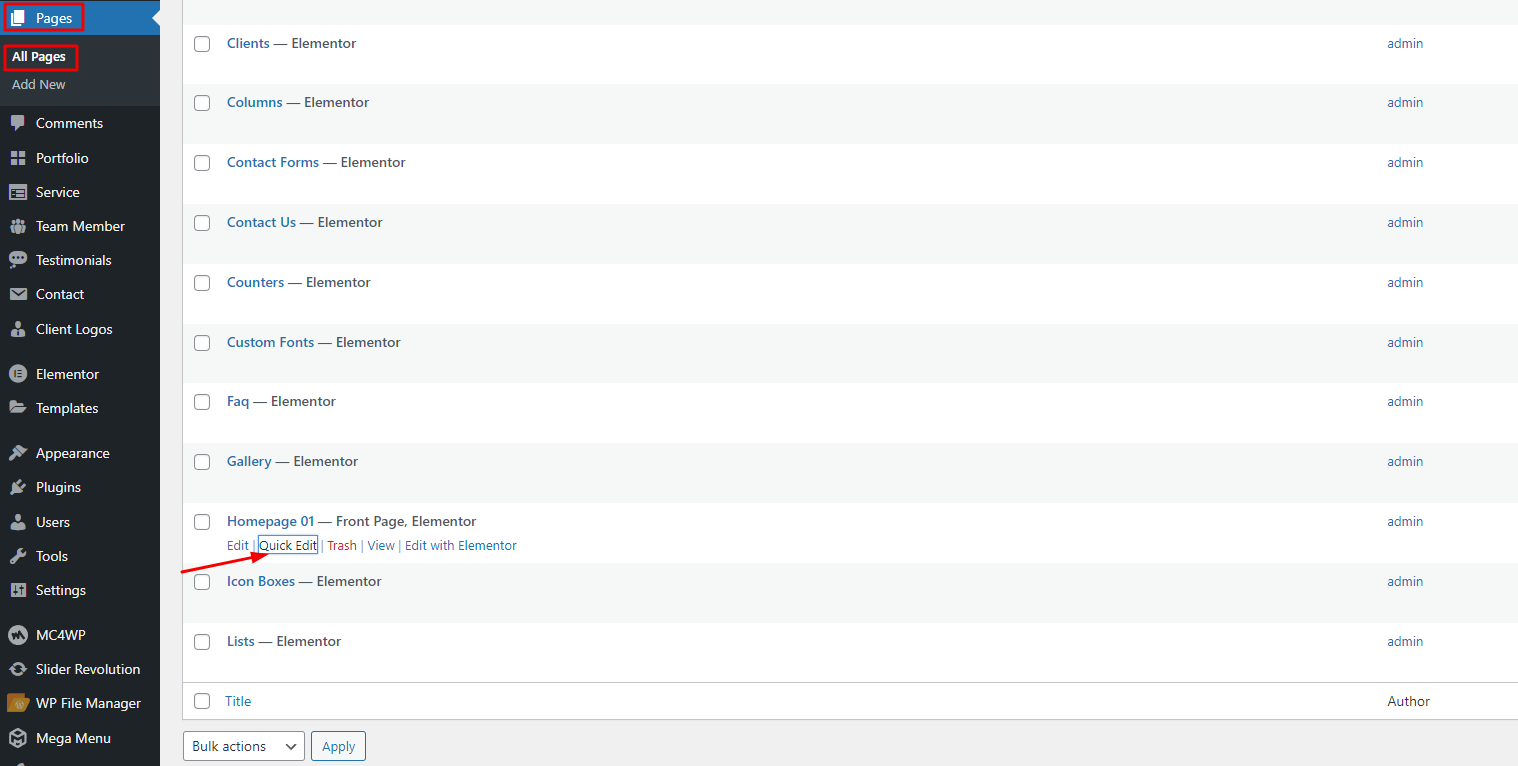
How to Change Page Title
Step 1 : Go to Pages > All Pages . Then point at the page you want to edit. You will see the Quick Edit option.
Step 2 : Edit the title as you want. Delete the current slug. Then hit Update . It will automatically generate new slug for your page.
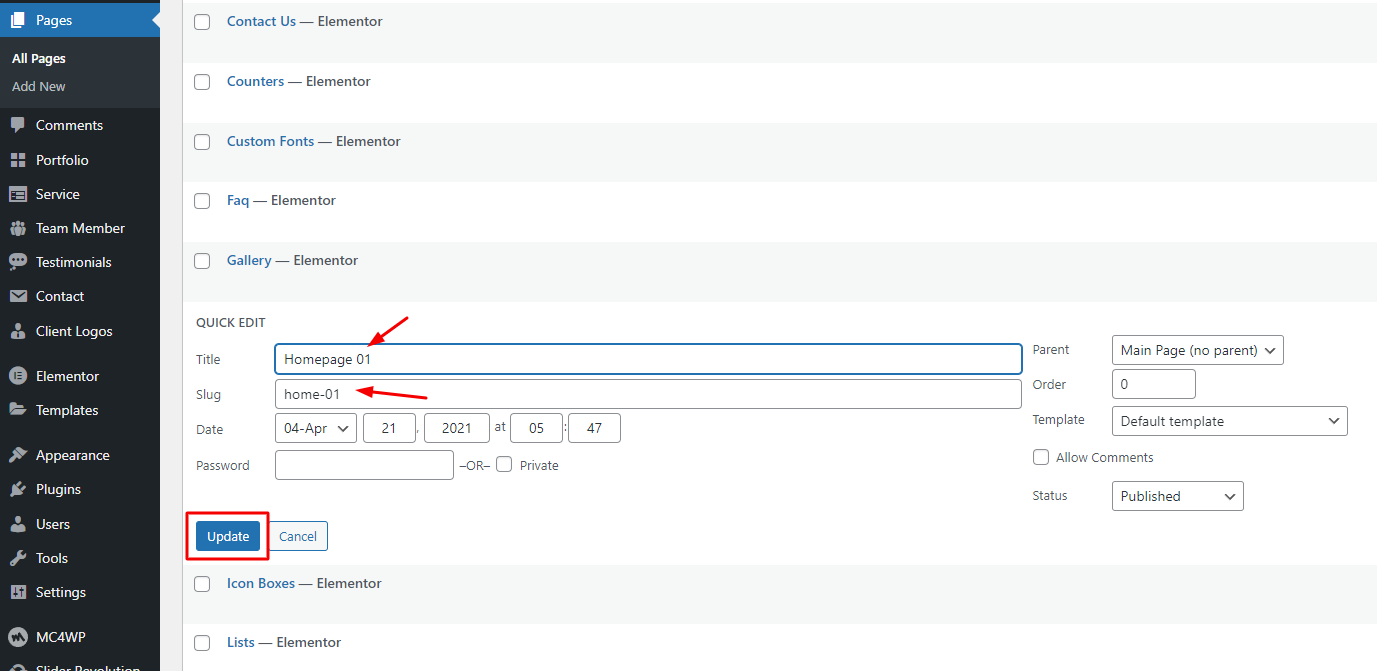
You can also edit some other options such as parent, template, status... If you want to edit more options, hit Edit instead of Quick Edit .
Elementor Setting
To learn basics of "Elementor" plugin, please read "Elementor" documentation online by clicking here .
Step 1 - Log in to your WordPress Administration Panel (Dashboard)
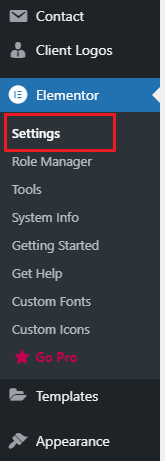
Step 2 - Click the Elementor -> Settings
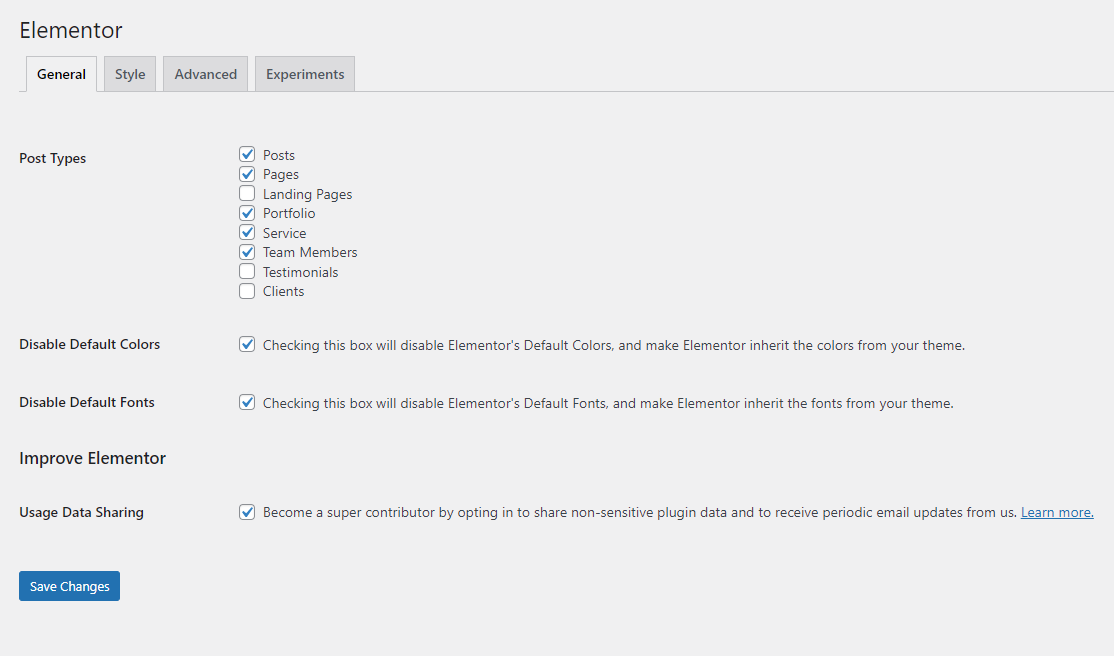
Step 3 - You will see all tabs for setting of elementor , in General tab
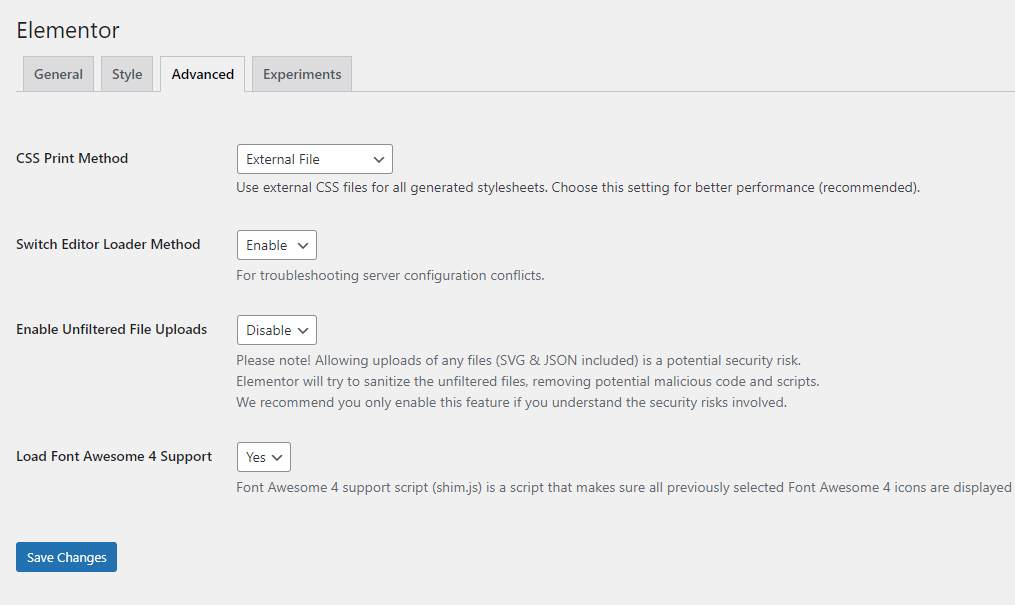
Step 4 - In Advanced tab you will see all Method style
How to Create a New Post
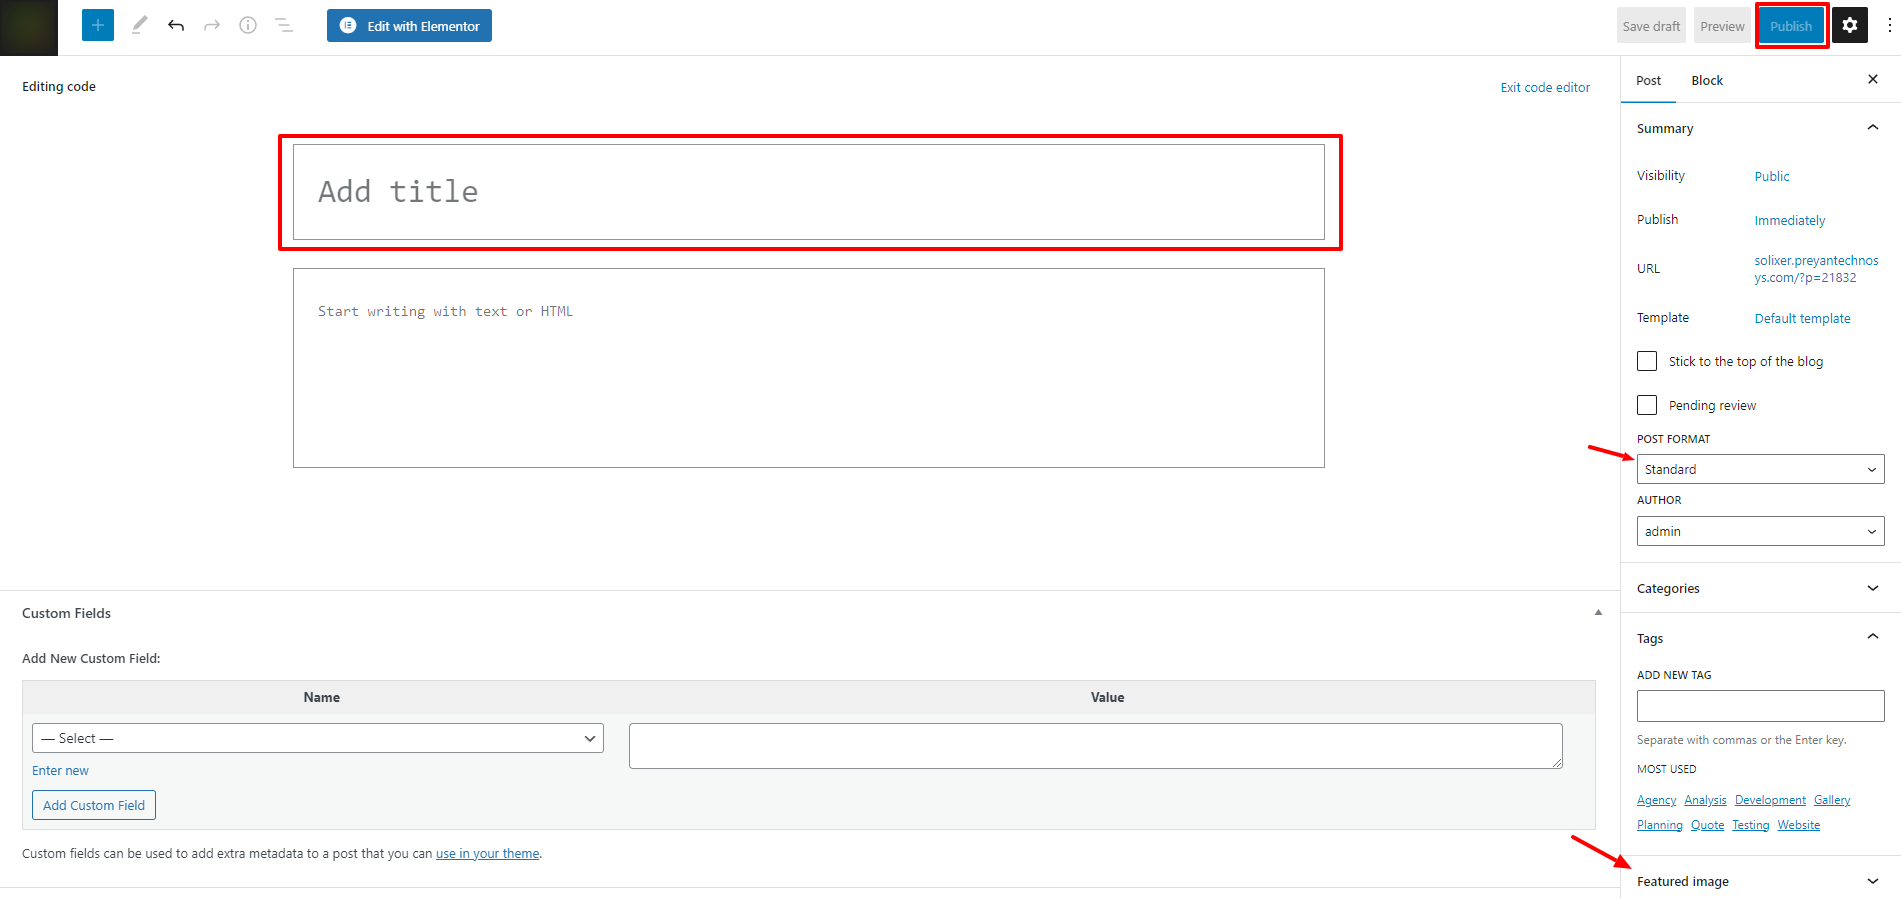
Step 1 : Navigate to Posts > Add New in your WordPress admin sidebar.
Step 2 : Create a title, and insert your post content in the editing field.
Step 3 : For a video/audio post, just simply paste the video/audio URL into the Embed Code field.
Step 4 : Add Categories from the right side. Categories is meta information you create for the post. Each category is a meta link that your viewer can click to view similar type of posts. To assign it to the post, check the box next to the Category name. You can also access and edit Categories from the Post sidebar item in your WordPress admin sidebar.
Step 5 : Add Tags from the right side. Tags is meta information you create for the post. Each tag is a link that your viewer can click to view similar type of posts. Type the name of the tag in the field, separate multiple tags with commas. You can also access and edit Tags from the Post sidebar item in your WordPress admin sidebar.
Step 6 : For a single image, click the first Featured Image Box , select an image and click the Set Featured Image button.
Step 7 : You can also customize Page Title & Sidebar Options in Settings .
Step 8 : Once you are finished, click Publish to save the post.
Here is the screenshot that shows the various areas of the blog post page:
How to Create a Category
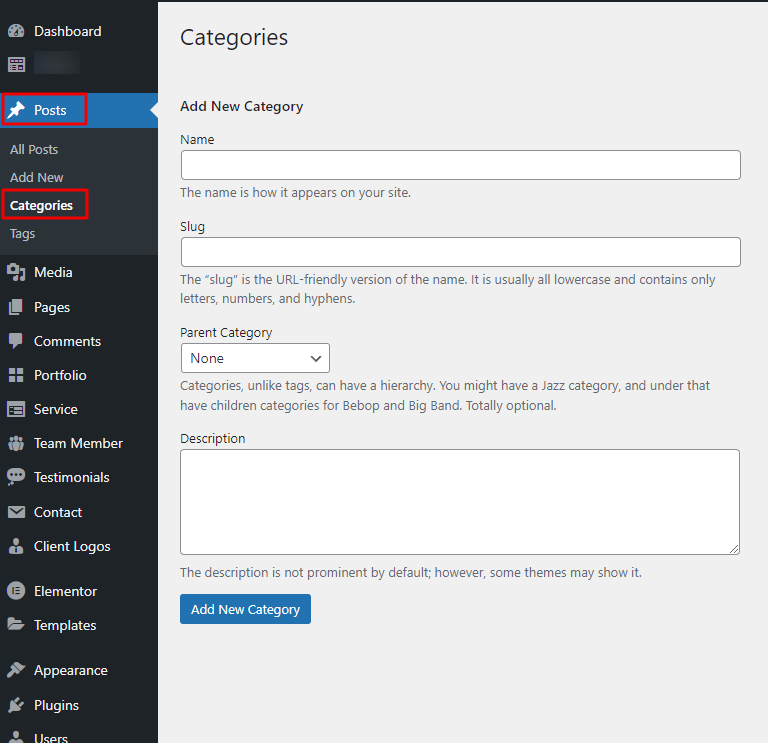
Step 1 : Post > Categories
Step 2 : Name the category and fill to other section below.
Step 3 : Hit Add New Category . Your new Category will aprear in the table of all category immediately.
Similar to Category , you can create a new Tag in the same way.
Credits
Scripts / Frameworks
Images
- Picjumbo: Thanks to picjumbo for great free images.
WordPress Plugins
Thank you for use this theme.
Once again, Thank you for using our free WordPress theme. We hope this documentation helps you build and customize your website successfully. As I said at the beginning, I'd be glad to help you if you have any questions relating to this theme. No guarantees, but I'll do my best to assist. If you have a more general question relating to the themes on Themetechmount, you might consider visiting the forums and asking your question in the "Item Discussion" section.